Improvised shelter and staying dry
If you are caught outside, get out of the wind and wet first: rig a tarp or poncho as a lean-to or tent on a safe site, put a thick layer of leaves or boughs under you, and keep your clothing loose, layered, and dry. If you are stranded in a car in a winter storm, CDC says staying in the car is often the safest choice.
If an evacuation, a breakdown, or a storm leaves you outside, shelter can matter more than food. The Army survival manual, ATP 3-50.21, chapter 6, says shelter protects you from sun, wind, rain, snow, and cold, and that in some areas it can take priority over food and even water, because long exposure to cold causes fatigue and weakness. Your clothing is your first shelter. These skills cover a night or two outdoors. For fallout, see shelter in place, and for a cold house, see staying warm without power.
Ready.gov’s kit list includes plastic sheeting and duct tape, a sleeping bag or warm blanket for each person, and a change of clothing and sturdy shoes, which cover most of what these skills need. Add a tarp or poncho and some cord.
Choosing a shelter site
Use it before you build anything. Start looking early: ATP 3-50.21 (6-9) says once shelter is a priority, start looking for a site as soon as possible.
- Find a spot big enough and level enough to lie down and keep your gear dry (ATP 3-50.21, 6-9).
- Look for protection from sun, wind, rain, and snow (6-9). Natural cover such as large rocks on the downwind side of a hill, thick bushes, or low-hanging limbs can save time and materials (6-14).
- Look up. Avoid dead trees and dead limbs that could fall (6-9, 6-11).
- Look around. Stay out of flash-flood areas, below high-water marks, and away from rockslide, mudslide, and avalanche paths (6-9).
- Avoid low-lying spots that collect cold air, which the manual calls a “cold sump” (6-9).
- Check for insects, snakes, and poisonous plants. Thick, brushy, low ground has more insects (6-9, 6-11).
- Prefer a spot where you can be seen and found, and near water (6-9).
- Clear rocks and twigs from where you will sleep (6-11).
Check it: lie down on the spot before you build. It should be level, dry, and free of anything overhead that could fall.
Tarp or poncho lean-to
Use it when you need a roof fast. It has one sloped side with its back to the wind. These steps follow ATP 3-50.21, paragraph 6-16, which uses a military poncho; a tarp with corner grommets works the same way. You need the tarp or poncho, 7 to 10 feet of rope or cord, three stakes about 1 foot long, and two trees or poles 7 to 10 feet apart.
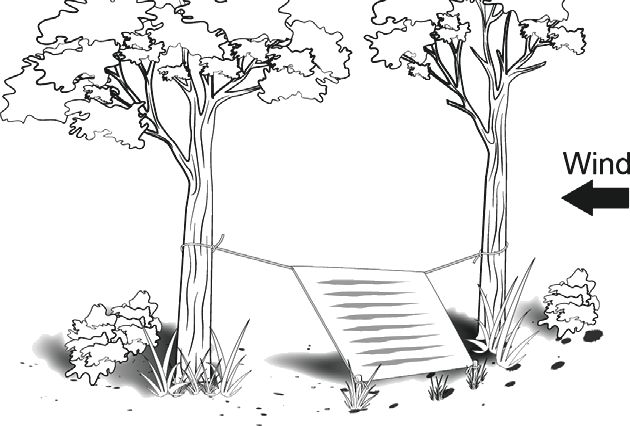
- Check the wind direction. Plan for the back of the lean-to to face into the wind.
- If using a poncho, tie off the hood: pull the drawstring tight, roll the hood lengthwise, fold it in thirds, and tie it with the drawstring.
- Cut the rope in half. Tie one half to each corner grommet on one long side.
- Tie a short stick (a “drip stick,” about 4 inches) to each rope about 1 inch from the grommet, so rain does not run down the rope into the shelter.
- Tie the ropes to the trees about waist high, using a round turn and two half hitches.
- Spread the tarp and stake the free edge to the ground through the grommets with sharpened sticks.
- If rain is expected or you will stay more than one night, add a center support: a line from the center (or poncho hood) up to an overhanging branch, with no slack. A stick propped under the center also works but takes up room.
- Pile brush or gear along the open sides to block wind and rain.
- Put insulating material, such as leaves or pine needles, on the ground inside (see insulating from the ground).
Check it: the tarp should be tight, with no wrinkles or sags where water could pool. ATP 3-50.21 (6-12) says fabric sheds rain only when it is stretched tight and wrinkle-free at a pitch of 40 to 60 degrees, and that touching the fabric while water runs over it lets water drip through at that spot.
See figure 6-2 in ATP 3-50.21.
Tarp or poncho tent
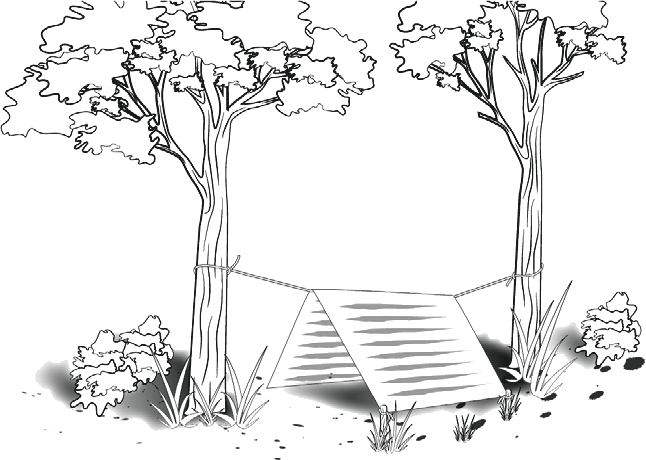
Use it when wind or rain comes from more than one side. It protects you on two sides but has less room than a lean-to (ATP 3-50.21, 6-17). You need the tarp or poncho, two ropes 5 to 8 feet long, six sharpened stakes about 1 foot long, and two trees 7 to 10 feet apart.
- If using a poncho, tie off the hood as for the lean-to.
- Tie one rope to the center grommet on each of two opposite sides.
- Tie the other ends to the two trees at about knee height, and stretch the tarp tight between them.
- Pull one side tight and stake it to the ground through the grommets.
- Do the same on the other side.
- If the middle sags, add a center support the same way as for the lean-to.
Check it: the ridge between the trees should be tight and both sides should slope steeply enough to shed rain (the 40 to 60 degree pitch above).
See figures 6-3 and 6-4 in ATP 3-50.21. If you have a long rope, the line-tightening steps on the knots page can make a tighter ridgeline between the trees.
Debris hut
Use it when you have no tarp and need warmth. ATP 3-50.21 (6-38) calls it one of the best shelters for warmth and ease of building. It takes time and a lot of leaves, so start early.
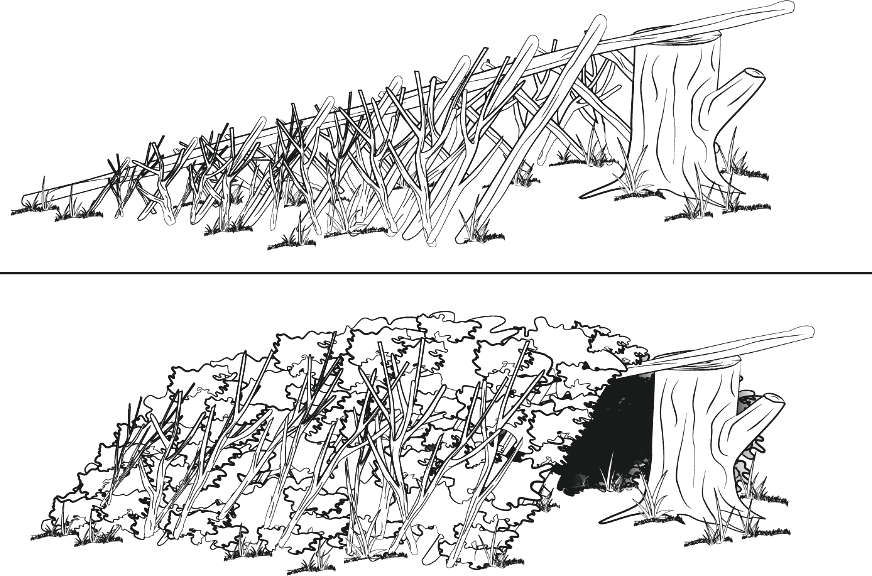
- Find a long, sturdy ridgepole.
- Raise one end: rest it on a tripod made with two short stakes, set it on top of a sturdy base, or tie it to a tree at about waist height.
- Lean large sticks along both sides of the ridgepole to make a wedge-shaped frame. Make it wide enough for your body and steep enough to shed water.
- Lay finer sticks and brush crosswise over the frame, as a lattice to hold the leaves.
- Pile light, dry, soft debris (leaves, grass, pine needles) over the frame until it is at least 3 feet thick. Thicker is better.
- Put a 2-foot layer of the same material inside, where you will lie.
- Pile more debris at the entrance that you can pull in after you to close it.
- Lay branches over the outside so the wind does not blow the debris away.
Steps follow ATP 3-50.21, paragraph 6-38.
Check it: the debris over the frame should be at least 3 feet thick, with about 2 feet of it under you, and you should be able to close the entrance from inside.
See figure 6-13 in ATP 3-50.21.
Insulating from the ground
Use it under any shelter, and any time you sit or lie on cold ground. ATP 3-50.21 (6-16) says that at rest you can lose as much as 80 percent of your body heat to the ground.
- Gather dry insulating material: leaves, pine needles, grass, moss, or evergreen boughs (6-12, 6-16).
- Pile it where you will lie, much thicker than seems necessary. The debris hut uses a 2-foot layer (6-38).
- Lay a sleeping bag, blanket, or extra clothing on top if you have them.
- Keep your gear and clothing off the bare ground too (6-6).
Check it: lie on the pile for a few minutes. It should still be thick under your hips and shoulders, and you should not feel the ground’s cold through it. Add more where it has compressed.
Dressing in layers and staying dry
Use it whenever it is cold, wet, or windy, indoors in an unheated house or outside. CDC says to stay dry, because wet clothing chills the body quickly.
- Base layer: wear fabrics that hold body heat and do not absorb moisture. CDC says wool, silk, or polypropylene hold more body heat than cotton.
- Insulating layer: CDC says an insulating layer helps you keep heat by trapping air close to your body, and that wool, goose down, or fleece work best.
- Outer layer: CDC says it should be tightly woven and preferably water and wind resistant.
- Cover your head, face, and hands. CDC lists a hat, a scarf or knit mask for the face and mouth, sleeves snug at the wrist, mittens (warmer than gloves), and a water-resistant coat and boots.
- Keep the layers loose. ATP 3-50.21 (6-7) says tight clothing and footwear cut circulation and invite cold injury, and several light layers are warmer than one thick one.
- Do not overheat. CDC says excess sweating makes your body lose more heat, so take off a layer whenever you feel too warm. ATP 3-50.21 (6-7) says to open your jacket, remove a layer or mittens, or push back your hood before you start to sweat.
- Dry wet clothing. ATP 3-50.21 (6-7) says to hang it in sun and wind, keep damp items near your body’s core so body heat dries them, or dry them near a fire. Near a fire, use the manual’s three-second rule: hold clothing only where you could keep the back of your hand for three seconds or more, and watch that it does not fall in.
- Keep it clean and mended. Dirty clothing loses insulation, and tears should be repaired before they grow (6-7).
Check it: ATP 3-50.21 (6-7) sums this up as COLDER: Clean, avoid Overheating, Loose layers, Dry, Examine, Repair. You should be warm without sweating.
Caution: cotton loses about 90 percent of its insulating value when wet and is very hard to dry, per ATP 3-50.21 (6-4). Wet clothing can conduct heat away from the body up to 25 times faster than dry clothing, depending on the fabric (6-7). For signs of hypothermia and frostbite, see first aid.
Sheltering in a car in winter
Use it if a winter storm strands you on the road. CDC says staying in your car when stranded is often the safest choice if winter storms create poor visibility or roads are ice covered. Ready.gov says if you are trapped in your car, stay inside. These steps are CDC’s.
- Tie a brightly colored cloth to the antenna to signal rescuers. If it is not snowing, raise the hood.
- Move anything you need from the trunk into the passenger area.
- Wrap your whole body, including your head, in extra clothing, blankets, or newspapers.
- Make sure snow is not blocking the exhaust pipe. CDC says this reduces the risk of carbon monoxide poisoning.
- Run the motor and heater for about 10 minutes per hour, with one window opened slightly for air.
- Stay awake. CDC says you will be less vulnerable to cold-related health problems.
- Keep moving your arms and legs as you sit, to improve circulation and stay warmer.
- Huddle with other people for warmth.
- Do not eat snow. CDC says it lowers your body temperature.
Check it: before each time you run the engine, check the tailpipe is clear and a window is cracked.
Before winter: Ready.gov says to keep an emergency kit in your car with jumper cables, sand, a flashlight, warm clothes, blankets, bottled water, and non-perishable snacks, and to keep a full tank of gas. CDC says not to travel in low visibility and to avoid ice-covered roads, overpasses, and bridges if at all possible.
Practice list
Shelter skills
Ticks are saved in this browser only. About this
Gear for this guide
- Power outage winter kit Sleeping bags, wool blankets, hats, a battery CO alarm, battery lights, and a radio for a winter power outage, based on CDC and Ready.gov guidance.
- Go bag list for evacuation What to pack in a go-bag you can carry if officials tell you to evacuate, based on Ready.gov's kit list, with a printable checklist.