Knots every household should know
Seven knots cover most household jobs: a square knot or sheet bend to join two ropes, a bowline for a loop that will not slip, a clove hitch or round turn and two half hitches to tie onto a post or tree, a figure-eight to stop a rope end, and a slip-knot tightener to pull a line taut. The steps below follow the US Army's survival and mountaineering manuals.
A few knots let you rig a tarp, tie down a load, hang a clothesline, or lash gear together when the power is out or you have left home. The Army’s survival manual, ATP 3-50.21, Appendix A, says a basic knowledge of ropes and knots is needed to build shelters and make tools. Practice each knot with a real rope before you need it.
Three words used in the steps (ATP 3-50.21, paragraph A-1):
- Running end: the free end of the rope, the one you tie with.
- Standing part: the rest of the rope.
- Bight: a U-shaped bend in the rope.
Dress every knot. Dressing means lining up and straightening all the parts of the knot, then pulling each part snug. ATP 3-50.21 (A-2) says neglecting this can cut knot strength by 50 percent, and a loosely tied knot can deform under strain, turn into a slipknot, or come untied.
Square knot
Use it to join the two ends of the same rope around a bundle, or two ropes of equal thickness.
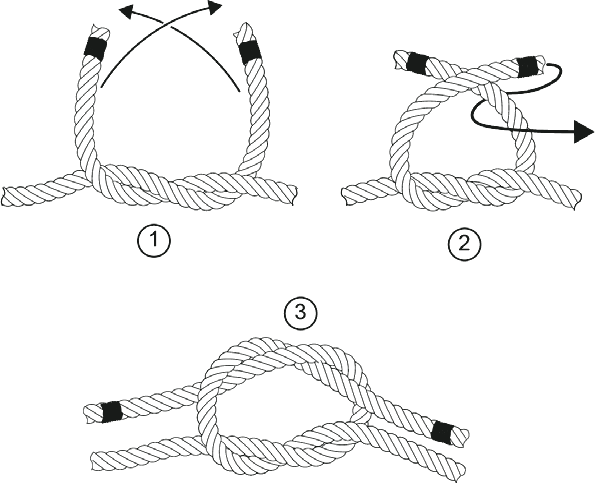
- Hold one rope end in each hand.
- Lay the right-hand end over the left-hand end.
- Wrap it under and back up over the top of the left-hand rope.
- Now lay the end that is in your left hand over the end in your right hand.
- Wrap it under and back up over the top, the same way as in step 3.
- Pull both standing parts to tighten, then dress the knot.
- If the knot will be under strain, tie an overhand knot in each tail, against the square knot.
Steps 1 to 7 follow TC 3-97.61, paragraph 8-76.
Check it: you should see two bights locked into each other, and each running end should lie alongside its own standing part, on the same side (TC 3-97.61, 8-77). If the ends do not lie parallel to their own standing parts, you have tied a “granny knot.” ATP 3-50.21 (A-8) says a granny knot slips under strain and should not be used. To untie a square knot, grab the two bends of the bights and push them apart (A-9).
Caution: TC 3-97.61 (8-75) says to use the square knot as a joining knot only when you cannot tie a more secure one. It is fine for a bundle; do not trust it with a heavy load.
See figure A-5 in ATP 3-50.21 and figure 8-18 in TC 3-97.61.
Sheet bend
Use it to join two ropes of different thickness, such as a thin cord to a heavier rope.
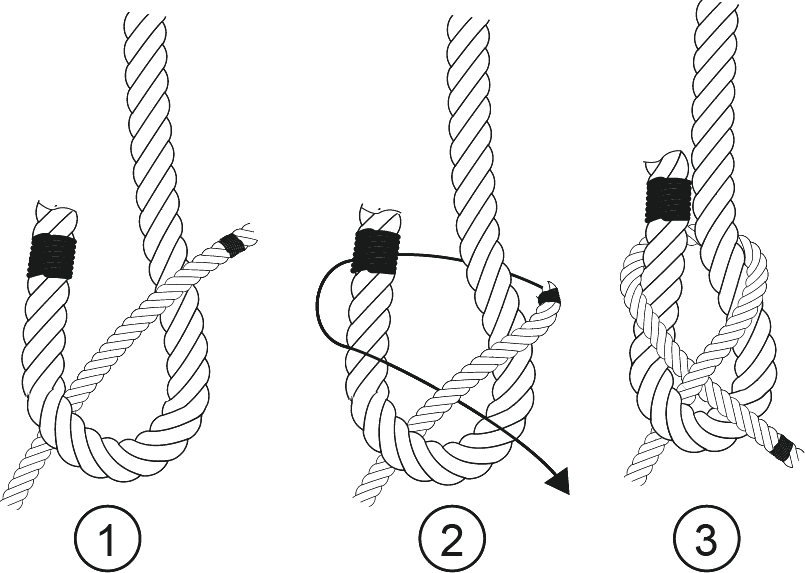
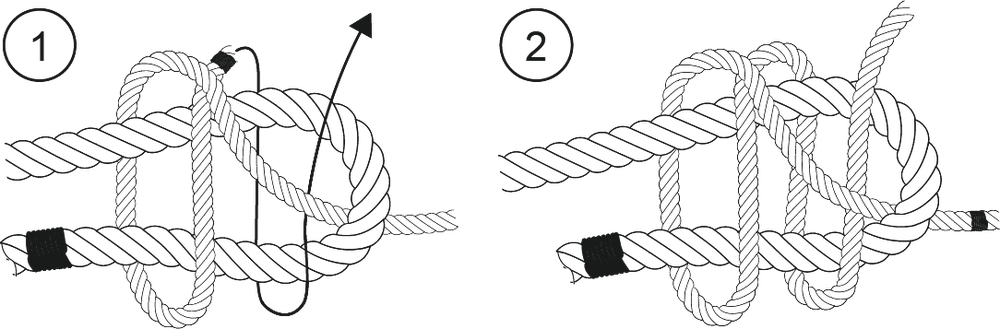
- In the end of the thicker rope, make a bight (a U shape) and hold it.
- Pass the running end of the thinner rope up through the bight.
- Take the thin end around behind both legs of the bight.
- Tuck the thin end back under itself, where it entered the bight.
- Pull the thin rope’s standing part and the bight apart to tighten.
- For wet rope, or for more security, make a double sheet bend: before tightening at step 5, take one more turn around both legs of the bight and tuck under again, then tighten.
Steps follow ATP 3-50.21, paragraphs A-10 and A-11.
Check it: the thin rope should wrap once around the whole bight and pinch under itself, with both short ends on the same side of the knot.
Caution: ATP 3-50.21 (A-10) limits the single sheet bend to dry ropes of unequal size and says it may loosen or slip when the tension comes off. It says the double sheet bend (A-11) works better for ropes of equal or unequal size, for wet ropes, and for tying a rope to an eye, and will not slip or draw tight under heavy loads.
See figures A-6 and A-7 in ATP 3-50.21.
Bowline
Use it when you need a loop in the end of a rope that holds its size, such as a loop around a post or a loop to throw over a hook.
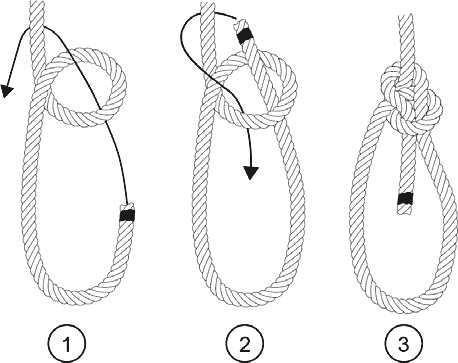
- If tying around an object, pass the running end around or through it first.
- In the standing part, make a small loop with the standing part underneath. Leave enough rope in the running end to form the big loop you want.
- Pass the running end up through the small loop from underneath.
- Take the running end around behind the standing part.
- Bring it back down through the small loop, so it lies beside the rope that came up through.
- Hold the running end against the side of the big loop and pull the standing part to tighten. Dress the knot.
- Tie an overhand knot with the tail as a backup, leaving about a 4-inch tail.
Steps 1 to 6 follow ATP 3-50.21, paragraph A-13. The overhand backup and 4-inch tail in step 7 come from TC 3-97.61, paragraphs 8-79 and 8-80.
Check it: a bight of the rope should be locked in place by the small loop, and the short tail should sit on the inside of the big loop (TC 3-97.61, 8-80). ATP 3-50.21 (A-13) notes the bowline is easy to untie.
See figure A-8 in ATP 3-50.21 and figure 8-19 in TC 3-97.61.
Clove hitch
Use it to fasten a rope to a pole, pipe, rail, or post. It can be tied at the end of a rope or anywhere along it. ATP 3-50.21 (A-1) says lashings, used to tie poles together, start and end with clove hitches.
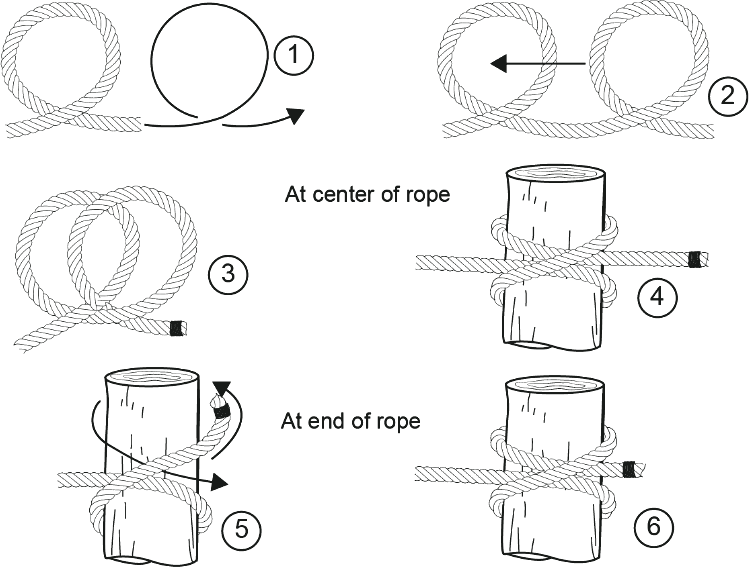
At the end of a rope (ATP 3-50.21, A-24):
- Wrap the running end once around the pole.
- Cross it over the standing part.
- Wrap it around the pole a second time, beside the first turn.
- Tuck the running end up under itself, under that second turn.
- Pull both ends to tighten.
In the middle of a rope, to drop over a post (TC 3-97.61, 8-106):
- Hold the rope in both hands, palms down, hands together.
- Slide your left hand about 10 inches to the left and form a loop.
- Slide your right hand about 10 inches to the right and form a second loop the same way.
- Lay the left loop on top of the right loop. They should sit back to back.
- Drop both loops over the post and pull the two ends in opposite directions.
Check it: you should see two turns side by side around the pole, with the two ends coming out in opposite directions. TC 3-97.61 (8-104) says the hitch is easy to adjust after it is tied.
See figure A-15 in ATP 3-50.21 and figures 8-28 and 8-29 in TC 3-97.61.
Round turn and two half hitches
Use it to anchor a rope to a tree or pole when the line will be loaded hard, such as the ends of a tarp ridgeline. ATP 3-50.21 (A-5) calls it the main anchor knot when high loads would make other knots jam and be hard to untie, and says it is most used to anchor rope to a pole or tree.
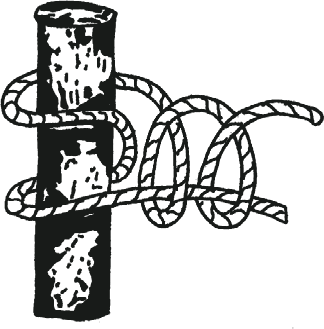
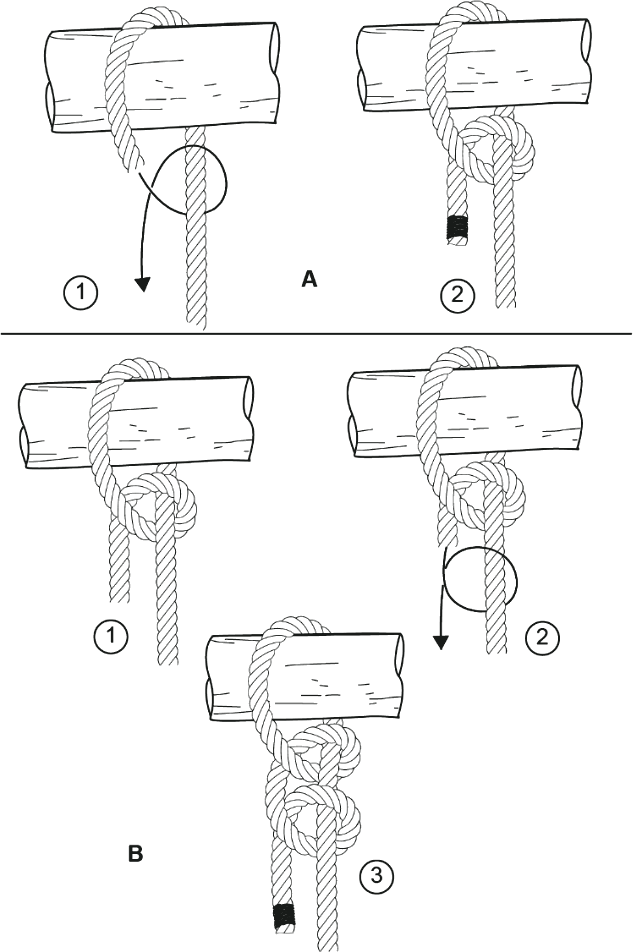
- Wrap the running end around the tree or pole one and a half times, so the running end comes back out alongside the standing part. That is the round turn (TC 3-97.61, 8-25).
- Take the running end around the standing part and tuck it back under itself. That is one half hitch.
- Take the running end around the standing part again, the same direction, and tuck it under itself again. That is the second half hitch.
- Slide the two half hitches up snug against the round turn.
Steps 2 and 3 follow ATP 3-50.21, paragraph A-21.
Check it: you should see one and a half wraps around the anchor, then two half hitches snug against them on the standing part, each tucked under itself in the same direction.
Caution: a half hitch alone is not secure. ATP 3-50.21 (A-20) says it tends to undo itself without a load, and the Army replaced it with the overhand knot as a finishing knot.
See figure A-3 and figure A-12 in ATP 3-50.21.
Figure-eight stopper knot
Use it in the end of a rope to stop the end from pulling through a grommet, a pulley, or another knot. ATP 3-50.21 (A-6) says it forms a larger knot than an overhand knot.
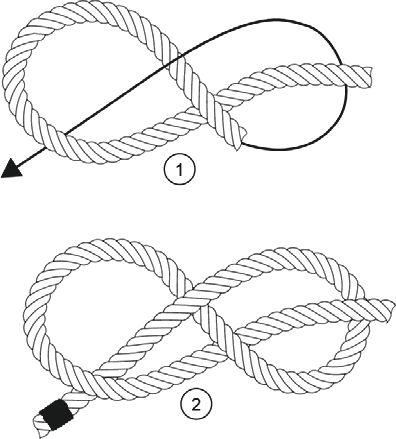
- Near the end of the rope, make a loop in the standing part.
- Pass the running end around behind the standing part.
- Bring it back over the near side of the loop.
- Pass it down through the loop.
- Pull the running end and the standing part to tighten.
Steps follow ATP 3-50.21, paragraph A-6.
Check it: the knot should look like the number 8 before you pull it tight. If it looks like a simple twist, you have tied an overhand knot; untie and repeat step 2.
See figure A-4 in ATP 3-50.21 and figure 8-7 in TC 3-97.61.
Tightening a line
Use it to pull a clothesline or tarp ridgeline tight between two trees or posts. This is a household version of the “transport tightening system” in TC 3-97.61, chapter 16, which uses a figure-eight slip knot as a pulley point. The manual uses a locking carabiner in the loop.
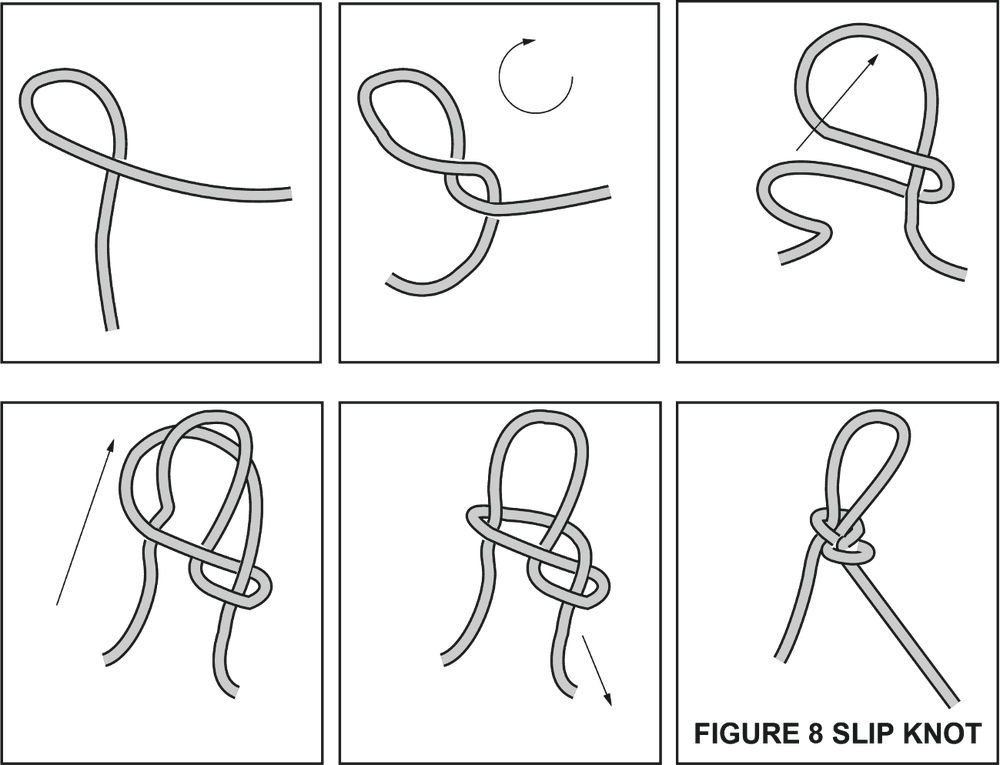
- Tie one end of the rope to the first anchor with a bowline or a round turn and two half hitches.
- Walk the rope toward the second anchor. Stop about 1 to 2 meters (3 to 6 feet) short of it (TC 3-97.61, 16-7).
- There, make a 12-inch bight in the rope (TC 3-97.61, 8-46).
- Hold the center of the bight in your right hand and the two parallel ropes in your left hand, about 12 inches up.
- With your right hand, twist the bight two full turns clockwise.
- Reach through the bight, grab the rope on the second-anchor side, and pull a new bight of it back through the original bight. This new bight is your adjustable loop.
- Pull down on the standing end and dress the knot. Secure the adjustable loop with a half hitch so it cannot slide (8-46, step 6).
- Clip a carabiner into the loop.
- Run the rest of the rope around the second anchor and clip it into the carabiner.
- Pull the free end to take the slack out of the line.
- Tie it off with a round turn and two half hitches, one of the tie-off methods TC 3-97.61 lists (16-5).
Check it: the slip knot should be in the shape of a figure eight, with both ropes of the bight passing through the same loop of the eight (TC 3-97.61, 8-47). The line should stay tight after you let go of the free end.
See figures 8-8 and 16-1 in TC 3-97.61.
For using these knots on a tarp, see improvised shelter.
Practice list
Knots
Ticks are saved in this browser only. About this