Map and compass navigation without GPS
To navigate without GPS, carry a paper map and a baseplate compass: orient the map to north, draw a line to where you are going, read the bearing, correct it for local magnetic declination, then walk from landmark to landmark along that bearing. Without a compass, a stick's shadow or the North Star gives you a rough north.
Ready.gov’s basic kit list includes local maps. The Army survival manual, ATP 3-50.21, chapter 7, says GPS is vulnerable to jamming and interference, that you should conserve its battery, and that you should use it together with other navigation tools. These skills work with a paper map, a basic baseplate compass, and a pencil. Learn them on a known trail or around your neighborhood first.
Reading a topographic map
Use it to picture the land before you walk it: where it is steep, where water runs, and where the roads go.
- Read the margin first. The USGS says every USGS map prints its contour interval in the margin. The margin also holds the scale bars and the declination diagram (USGS Fact Sheet 035-01).
- Learn the colors. Per the USGS symbols sheet: brown lines are contours, blue is water (lakes, streams, ditches), green is vegetation, red is land grids and important roads, and black is other roads, trails, railroads, and boundaries.
- Find the brown contour lines. Each one connects points of the same elevation (USGS). The thicker index contours carry elevation numbers. The thin lines between them fill in detail.
- Judge the slope. Contours close together mean steep ground. Widely spaced contours, or none, mean fairly level ground. Contours never cross (USGS).
- Spot the main shapes (ATP 3-50.21, 7-74):
- Hill: contours form closed rings; the smallest ring is the top.
- Valley: contours form U or V shapes, and the closed end of the U or V points upstream, toward high ground.
- Ridge: contours also form U or V shapes, but the closed end points away from high ground.
- Saddle: a low point between two higher areas, often shaped like an hourglass.
- Depression: a closed ring with tick marks pointing inward, toward low ground.
Check it: pick a stream on the map and say which way it flows using the V shapes, then pick the steepest slope on the sheet by where the lines bunch up.
See figures 7-15 through 7-22 in ATP 3-50.21.
Measuring distance on a map
Use it to find how far a walk or drive really is.
Straight line (ATP 3-50.21, 7-79):
- Lay the straight edge of a piece of paper on the map so it touches both points.
- Mark the paper at each point.
- Move the paper to the scale bar in the map margin and read the distance between the marks.
Winding road or trail (ATP 3-50.21, 7-80):
- Mark one end of the paper and set that mark on your starting point.
- Line up the paper’s edge along the first straight stretch. Mark the paper and the map where that stretch ends.
- Hold the marks together with a pencil point and pivot the paper to line up with the next straight stretch. Mark again.
- Repeat to the end, then lay the paper on the scale bar and read the total.
Know your scale. On a 1:24,000 USGS map, 1 inch equals 2,000 feet on the ground. On a 1:100,000 map, 1 inch is about 1.6 miles (USGS Fact Sheet 035-01).
Check it: measure a route you already know, such as home to a nearby school, and compare it with your car’s odometer.
On foot, count paces. ATP 3-50.21 (7-83) defines a pace as the distance covered each time the same foot touches the ground. Walk a measured course several times and average your count, so you know your paces per 100 meters or per mile. The manual says pace distances are only approximate.
Reading a compass
Use it to learn your compass before you rely on it. The USGS instructions on this page are written for a baseplate compass, the flat, clear kind with a rotating dial.
- Learn the parts, as the USGS names them:
- Baseplate: the clear, flat plate with straight edges.
- Direction-of-travel arrow: the arrow on the baseplate that points where you will walk.
- Dial (compass ring): the ring that turns, marked in degrees.
- Index line: where you read the number on the dial.
- Orienting arrow: the outline arrow inside the dial that turns with it.
- Red magnetic needle: the needle that swings to magnetic north.
- Learn the numbers. North is 0 or 360 degrees, east is 90, south is 180, and west is 270 (USGS Fact Sheet 035-01).
- Step away from metal: keys, belt buckles, cars, fences, railroad tracks, and power lines all throw off the needle (USGS Fact Sheet 035-01, USGS).
- Hold the compass flat in front of you with the direction-of-travel arrow pointing straight away from you (USGS).
- Turn the dial until the orienting arrow sits under the red magnetic needle.
- Read the number at the index line. That is the magnetic direction you are facing. To get the true direction, correct it for declination (next section).
Check it: face a direction you know, such as a street that runs north-south, and see if your reading agrees within a few degrees.
Correcting for declination
Use it every time you move between a map and a compass. The map is drawn to true north. The compass needle points to magnetic north. NOAA defines declination as the angle between the two, and says it changes over time and with location.
- Find your declination. The diagram at the bottom of a USGS map shows true north (a star) and magnetic north (MN) (USGS). If the map is more than 15 years old, get a current value from the NOAA declination calculator.
- Note the sign. If magnetic north is east of true north, declination is positive (east). If it is west, it is negative (west) (USGS).
- Map to compass (you drew a bearing on the map and want to walk it): subtract a positive declination, or add a negative one (USGS).
- Compass to true direction (you read a bearing on the ground and want the true direction): add a positive declination, or subtract a negative one (USGS).
- Or set it once. If your compass has adjustable declination, turn its adjustment (a screw or the inner capsule) until the orienting arrow is offset from the dial’s north by your declination, east or west. Then you do not add or subtract (USGS).
Check it: the USGS gives a worked example. With declination 10 degrees east and a destination due north (0 degrees true), a compass without adjustable declination is set to 350 degrees.
Caution: the USGS fact sheet notes that the declination printed on any map may not be current, because magnetic north keeps moving.
Orienting a map
Use it so the map in your hands lines up with the land in front of you.
With a compass (USGS):
- Lay the map flat. Place the compass on it with the edge of the baseplate along the map’s north-south border.
- Turn the dial until north on the dial lines up with north on the map.
- Adjust for declination: subtract if positive, add if negative. (Skip this if your compass is already set for declination.)
- Holding the compass in place on the map, turn the map and compass together until the red needle sits over the orienting arrow.
- Check for metal nearby, such as rebar in concrete.
Without a compass (ATP 3-50.21, 7-72):
- Find a straight feature you can see both on the ground and on the map, such as a road, railroad, or power line.
- Turn the map until that feature on the map runs the same way as the feature on the ground.
- Line up a second feature, or a landmark you can see, to make sure the map is not turned backward. ATP 3-50.21 warns that using only one linear feature can reverse your directions.
Check it: the features around you should sit in the same directions as they do on the map: a hill to your left should be to the left on the map.
Taking and following a bearing
Use it to walk from where you are to a place on the map. These steps are for a compass not set for declination (USGS Method #2).
- Draw a line on the map from your position to your destination.
- Move away from metal.
- Lay the compass on the map with the edge of the baseplate along your line and the direction-of-travel arrow pointing toward the destination.
- Without moving the compass, turn the dial until north on the dial lines up with north on the map.
- Lift the compass off the map. Hold it flat with the direction-of-travel arrow pointing straight away from you. Turn your whole body until the red needle sits over the orienting arrow.
- Correct for declination: if positive, turn the dial clockwise by that amount; if negative, turn it counterclockwise.
- Turn your body again until the red needle sits over the orienting arrow.
- Look along the direction-of-travel arrow and pick a landmark on that line: a distinct tree, rock, post, or building. Walk to it.
- At the landmark, repeat steps 7 and 8 until you arrive.
Tips from ATP 3-50.21:
- Do not walk with the compass held out in front of you. Sight a landmark, then walk to it (7-54).
- Choose the most distant landmark you can recognize the whole way, and the highest one if there is a choice (7-55).
- If your goal sits on a road, stream, or other long feature that crosses your path, aim about 10 degrees to one side on purpose. When you hit the feature, you will know which way to turn (7-58).
- Errors add up with distance. Each time you reach a feature you can find on the map, confirm your position and restart your pace count (7-60).
Check it: read your bearing at least twice before you set off. The USGS says to make sure it agrees with your direction of travel: due east is 90 degrees, not 270.
Finding north without a compass
Use it when you have no compass or want to confirm one. Both methods give rough directions.
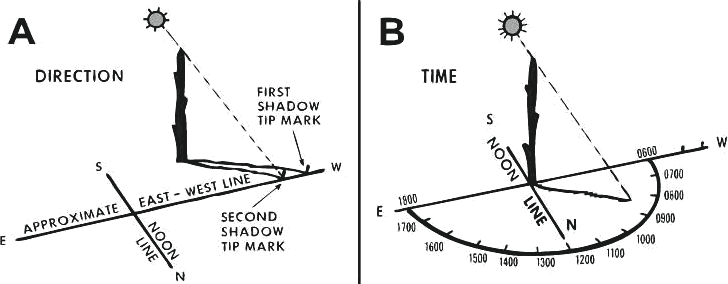
Shadow-tip method, by day (ATP 3-50.21, 7-22):
- Push a stick into the ground on a level spot where it casts a clear shadow.
- Mark the tip of the shadow with a stone or twig. This first mark is west.
- Wait 10 to 15 minutes, until the shadow tip has moved a few inches.
- Mark the new tip. This second mark is east.
- Draw a straight line through the two marks. That is a rough east-west line.
- Stand with the first mark (west) on your left. North is in front of you, east to your right, and south behind you.
ATP 3-50.21 says the method does not work beyond about 66.5 degrees latitude, north or south (7-22), and that tilting the stick for a more convenient shadow does not hurt its accuracy (7-23).
North Star, at night (ATP 3-50.21, 7-33 and 7-34):
- Find the Big Dipper, seven stars in the shape of a dipper.
- Find the two stars that form the outer lip of the dipper’s bowl, the “pointer stars.”
- Draw a line from the bottom pointer star through the top one, and extend it about five times the distance between them.
- The North Star (Polaris) is on that line. It is the last star in the handle of the Little Dipper.
- Face the North Star. Straight below it, on the horizon, is true north.
Check it: ATP 3-50.21 (7-35) says the North Star sits about as high above the horizon, in degrees, as your latitude. At 35 degrees north, look about 35 degrees up.
Caution: do not trust moss on trees. ATP 3-50.21 (7-44) says moss grows completely around some trees and cannot be relied on to show north.
See figure 7-8 (shadow-tip) and figure 7-11 (northern sky) in ATP 3-50.21.
Planning a route on a paper map
Use it before an evacuation, while you still have power and time. Keep a paper road map or state atlas in the car and in your go-bag. The evacuation routes guide covers route choice for a nuclear emergency in more depth.
- Mark home and at least two destinations, such as a friend’s home in another town or a motel. Ready.gov says to choose destinations in different directions.
- Mark any designated evacuation route. Ready.gov says many states have designated evacuation zones and routes; your state and county emergency management websites list them.
- Trace a main route to each destination with a highlighter, and a different color for at least one alternate route. Ready.gov says to be familiar with alternate routes out of your area.
- Measure each route with the paper-strip method above and write the distance in the margin.
- Mark where you could buy fuel. Ready.gov says to keep at least a half tank of gas at all times, and a full tank if an evacuation seems likely, because gas stations may be closed or unable to pump during power outages.
- Fold the map so the routes face out and keep it with your kit.
Check it: someone else in your household should be able to follow your highlighted routes without you.
Caution: during an evacuation, Ready.gov says to follow recommended evacuation routes, not take shortcuts that may be blocked, watch for washed-out roads and bridges and downed power lines, and not drive into flooded areas. Always follow the instructions of local officials.
Practice list
Map and compass
Ticks are saved in this browser only. About this