Basic sewing and mending by hand
With a needle, thread, scissors, and pins you can repair most clothing by hand: a backstitch closes a split seam, a few stitches put a button back on, and a patch covers a hole. The steps below come from Oregon State University, University of Florida, and University of Tennessee extension guides.
When stores are closed or money is short, clothes have to last. A few hand stitches keep a garment wearable long after a seam splits or a button falls off, and the University of Tennessee Extension says to repair rips, tears, and holes as soon as possible, because the longer one is ignored the larger it becomes. The basic kit is short: hand needles in assorted sizes, pins, safety pins, scissors, and thread in a few basic colors (white or beige, navy, brown, black, and medium gray). A needle threader helps.
Thread a needle and tie a knot
Use this before every repair.
- Choose a needle that slips easily through the fabric and does not leave holes. Oregon State University Extension says sharps and embroidery needles suit most hand sewing (Oregon State University Extension).
- Choose thread to match the fabric. For cotton and wool, use cotton or polyester/cotton thread. For acrylic, polyester, and nylon, use polyester/cotton, polyester, or nylon thread. The color should match or be slightly darker than the fabric.
- Cut a length of thread. The University of Florida’s button guide uses about 16 inches (UF/IFAS Extension).
- Cut the end at an angle so it slides into the needle easily (Oregon State).
- Pass that freshly cut end through the eye of the needle. If it will not go, use a needle threader (UF/IFAS).
- Tie a knot in the same end you threaded. Oregon State says this keeps the twist and the thread smooth.
- For a button or other strong repair, pull both tails even and knot them together to sew with doubled thread. UF/IFAS says single thread is usually not strong enough for buttons unless the thread is thick.
Check: the knot holds when you tug the thread. For permanent stitching, Oregon State says to place the knot out of sight against an inside layer of the fabric.
Pulling the thread through beeswax adds strength and slipperiness, but do not use it on fabric that stains from oil (Oregon State).
Running stitch
Use this for quick mending and for seams that will not be under strain. Oregon State calls it a basic stitch for basting, easing, gathering, mending, and seams with no strain (Oregon State University Extension).
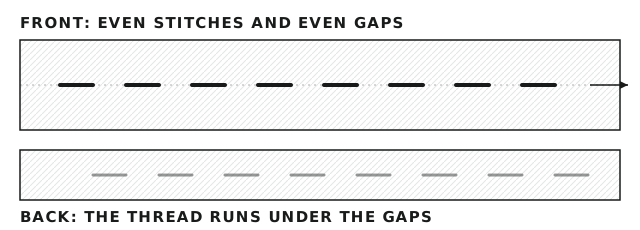
- Start with the knot hidden on the inside of the fabric.
- Weave the needle in and out of the fabric, taking several stitches forward on the needle at once.
- Pull the thread through.
- Repeat along the line.
- Size the stitches for the job: Oregon State says to use shorter stitches for permanent sewing and longer ones for basting.
Check: the stitches are short and even along the whole line.
See figure 3 in Oregon State’s Hand-Sewing Skills fact sheet.
Backstitch
Use this where strength matters. Oregon State calls the backstitch a strong hand stitch for repairing seams and hard-to-reach areas, and the University of Tennessee Extension calls it one of the strongest hand stitches (Oregon State University Extension).
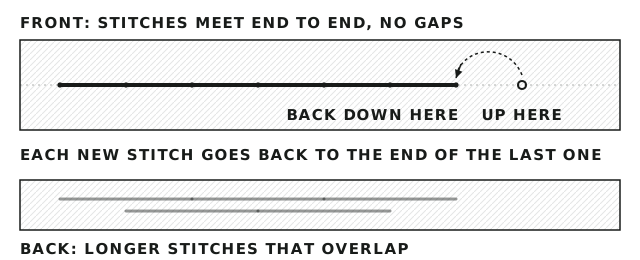
- Place the fabric with right sides together.
- Bring the needle up through the layers.
- Insert the needle about 1/16 to 1/8 inch (1.5 to 3 mm) behind where the thread came up.
- Bring it out again 1/16 to 1/8 inch ahead of where the thread came up.
- For each new stitch, insert the needle at the end of the last stitch and bring it out one stitch ahead.
Check: the top side looks like a continuous line of machine stitching. The University of Tennessee Extension says the stitches underneath will be about twice as long as those on top (UT Extension).
See figure 4 in Oregon State’s fact sheet.
Whipstitch
Use this to hold two finished edges together, or, as overcasting, to stop a raw edge from raveling. Oregon State describes the whipstitch and overhand stitch as closer, tighter versions of overcasting (Oregon State University Extension).
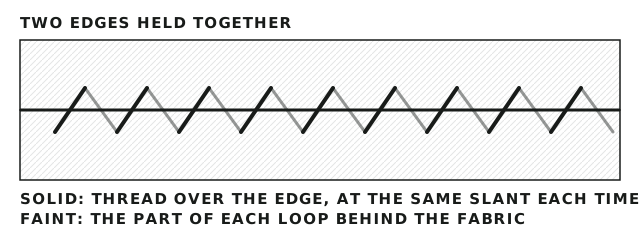
- Hold the two finished edges together, or hold the single raw edge you want to finish.
- Bring the needle out near the edge.
- Pass the thread over the edge and insert the needle at a right angle through the back and front edges, so the stitches slant.
- Repeat, keeping the stitches close together, at an even spacing and depth.
- To overcast a raw edge instead, take diagonal stitches over the edge at a uniform space and depth, a little farther apart.
Check: the stitches slant evenly over the edge and the edges stay closed when you gently pull them apart.
See figures 6 and 7 in Oregon State’s fact sheet.
Repair a split seam
Use this when a seam opens at a stress point. The University of Tennessee Extension says crotch, underarm, and pocket seams often wear out and split first (UT Extension).
- Work out why it split. UT Extension says a seam may split because the garment is too tight, or because cotton thread wore out on long-wearing polyester fabric.
- Check the fiber content on the label, and use thread of the same fiber.
- Remove the loose threads from the seam.
- Turn the garment inside out and put the right sides of the fabric together along the seamline.
- Secure your thread about 1/2 inch before the point where the old stitching broke.
- Backstitch along the original seamline, past the opening, to about 1/2 inch into the unbroken stitching on the other side.
- Knot the thread on the inside.
Check: turn the garment right side out and gently pull on both sides of the seam; it should not gap.
Sew on a button
Use this when a button is loose or gone. Look for a spare: the University of Florida IFAS Extension says spare buttons are often sewn to a tag inside the garment or come in a bag with the price tag. UT Extension says to re-sew a button as soon as its threads start to loosen, and to patch the fabric first if the button tore a hole (UT Extension).
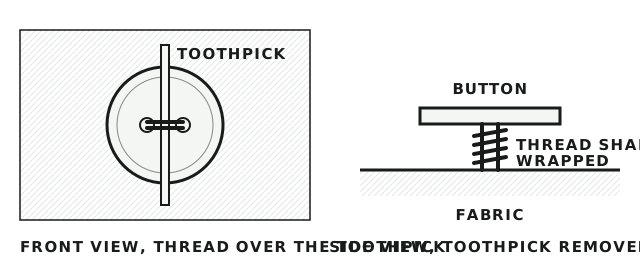
For a flat two-hole button (UF/IFAS):
- Thread the needle with doubled thread and knot it.
- From the inside of the garment, push the needle up through the fabric where the button belongs.
- Pass the needle up through one hole of the button, center the button on its mark, and go back down through the other hole and the fabric.
- Lay a toothpick or a needle across the top of the button, under the thread, to leave slack for a thread shank.
- Stitch through the holes a few more times.
- Remove the toothpick. Bring the needle up between the button and the fabric, not through a hole, and wrap the thread tightly around the stitches a few times.
- Pass the needle to the inside of the garment and knot it off.
For a flat four-hole button, do the same, but stitch diagonally from one hole to the opposite one, then across the other pair, to form an “X.” Repeat a few times. UF/IFAS says two parallel bars hold just as well with strong thread and enough stitches.
For a shank button (a loop or post on the back), pass the thread through the shank instead of through holes, stitch through it a few times, then knot it off on the inside a couple of times. UF/IFAS says shank buttons can only be sewn on by hand.
Check: the button sits slightly above the fabric and goes through the buttonhole without pulling. UT Extension says the shank should be about 1/8 inch longer than the thickness of the fabric so the buttonhole lies smoothly.
See figures 5 and 6 in the UF/IFAS guide.
Patch a hole or tear
Use this when a hole or tear is too big to stitch closed. The University of Tennessee Extension says patching suits damage that is large or cannot be darned or mended another way (UT Extension).
- Wash the garment first. UT Extension says to clean it before patching.
- Trim the damaged area to a square or rectangle. UT Extension says this makes the patch easier to apply and stitch.
- Cut a patch at least 1 inch larger than the area to be patched, from similar fabric if you have it.
- Pin the patch over the hole on the outside of the garment.
- Sew around all the edges. UT Extension says surface patches look neater and last longer if the edges are stitched, and that hard-to-reach areas can be hand stitched with a backstitch or a blanket stitch.
- Knot the thread on the inside.
Check: the patch lies flat, covers the hole with margin on every side, and no edge lifts when you run a finger around it.
Iron-on patches and iron-on mending tape are a no-sew option. UT Extension says to choose ones compatible with the fabric’s fiber, color, and texture.
Practice list
Practice list
Ticks are saved in this browser only. About this