How to build and put out a fire safely
Build a fire only where rules allow it, on cleared bare ground well away from anything that can burn, and grow it in three stages: tinder, then kindling, then fuel. When you are done, drown it with water, stir, and feel for heat until it is cold, and never leave it burning.
In a long outage or after an evacuation, a fire can boil water, dry wet clothes, warm you, and cook food. The Army survival manual, ATP 3-50.21, chapter 5, lists those uses and says fire must be used with caution to prevent damage and injury. Every fire depends on three things, heat, oxygen, and fuel: remove any one and it goes out (ATP 3-50.21, 5-3). That is how you build a fire and also how you put one out.
Choosing a safe fire site
Use this before any outdoor fire, in a backyard pit or at a campsite.
- Check for fire restrictions or closures first. The USDA Forest Service says to check with the local forest or ranger district, and to use alternatives to campfires during high fire danger even if there are no restrictions.
- Use an existing fire pit or designated fire area where there is one (NPS, Grand Teton).
- Keep the distance. The US Fire Administration says to build campfires at least 25 feet from tents, shrubs, and anything that can burn, and to use fire pits and outdoor fireplaces at least 10 feet from your home or anything that can burn.
- Look up and around. Do not build a fire near overhanging branches, steep slopes, rotten stumps, logs, dry grass, or leaves (NPS).
- Pick a flat, dry spot protected from the wind and away from snow-laden trees (ATP 3-50.21, 5-5).
- Clear leaves, plants, and duff down to bare soil over a circle at least 3 feet (1 meter) across (ATP 3-50.21, 5-6).
- Remove porous rocks from the fire site. ATP 3-50.21 (5-6, 5-8) warns they hold water and can explode when heated.
- Before you light it, put water and a shovel next to the fire (NPS).
Check it: bare soil under and around the fire, nothing that can burn within the distances above, nothing overhead, and water and a shovel within reach.
Caution: keep the fire small, and never leave it unattended, even for a moment, or leave children alone with it (NPS).
Gathering tinder, kindling, and fuel
Gather all three before you light anything. ATP 3-50.21 (5-9) says a fire built without one of these phases is likely to fail.
- Tinder: collect at least a cupped handful of fine, dry material: dead dry grass, fine wood shavings, shredded inner bark, seed down, cotton balls, dryer lint, or paper (5-10 to 5-12). Keep damp natural tinder between layers of your clothing to dry it.
- Kindling: collect dead, dry twigs in three sizes: pencil lead, pencil, and thumb thickness, about 12 to 18 inches long. Gather at least a bundle the diameter of a soda can of each size (5-19). Dead twigs snap when bent.
- Fuel: collect dry, dead wood at least as thick as your forearm (5-20). Standing or leaning dead wood is usually dry even in rainy weather (5-21).
- Split wood if you can. The inner wood is the driest, and split wood burns faster and hotter than wood still in its bark (5-17).
- Stack each size separately within reach of the fire, off wet ground.
Check it: you should have far more kindling than looks necessary and enough fuel to keep the fire going as long as you need it.
Cautions (ATP 3-50.21):
- Skip rotten wood lying on the ground. It smolders, is hard to light, and makes heavy smoke (5-21).
- Do not burn poison ivy or poison oak. The smoke can cause respiratory distress if inhaled (5-22).
- Do not pour flammable liquids on a fire that is already lit. Even a smoldering fire can make the liquid explode and cause serious burns (5-21).
- Petroleum fuels and tires give off harmful smoke. Do not cook food directly over a petroleum-based fire (5-22).
Building a tepee fire
Use it to get a fire going fast. ATP 3-50.21 (5-24) says it burns well even with wet wood.
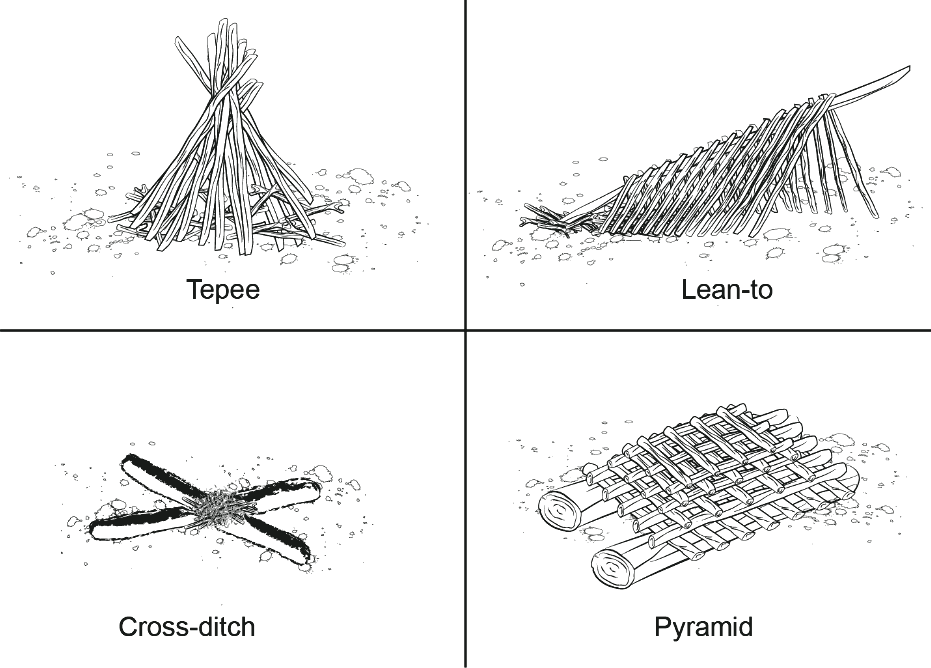
- Put a flat, dry base on the cleared ground, such as a slab of wood or bark, to keep tinder off the wet soil (5-8).
- Mound your tinder in the center of the base.
- Lean the smallest kindling over the tinder in a cone, like the poles of a tepee. Leave a gap on the upwind side so you can reach the tinder.
- Add a second layer of slightly thicker kindling around the cone, leaving small spaces between sticks for air (5-14).
- Light the tinder at its bottom edge, from the upwind side (5-13, 5-32).
- As the kindling catches, add more kindling, then fuel, leaning each piece against the cone. As the tepee burns, the outside sticks fall inward and feed the fire (5-24).
Check it: flames should climb up through the cone. If the fire smokes and dies, it needs more air: open the spaces between sticks rather than piling more on. ATP 3-50.21 (5-14) says kindling laid over tinder like a blanket starves the fire of oxygen.
See figure 5-5 in ATP 3-50.21.
Building a log cabin fire
Use it when you want strong heat and light, or a bed of coals to cook over. ATP 3-50.21 (5-28) says it makes a lot of light and heat because of how much air enters the fire, and creates a large bed of coals quickly.
- Put your tinder and a small tepee of kindling in the center of the cleared site.
- Lay two pieces of fuel wood parallel, one on each side of the tepee.
- Lay two more pieces across the ends of the first two, at right angles, to make a square.
- Keep adding layers, each at right angles to the one below, like the walls of a log cabin.
- Light the tepee in the center from the upwind side.
Check it: air should be able to move through the gaps in the walls, and flames should rise up through the middle.
See figure 5-5 in ATP 3-50.21.
Lighting a fire without matches
Use a ferro rod, which ATP 3-50.21 calls a metal match. The manual says it is not affected by wet or dry conditions, cold or hot weather, or age, and a single one can start thousands of fires (5-37, 5-38). It needs a striker or a hard, sharp metal edge, such as the back of a fixed-blade knife.
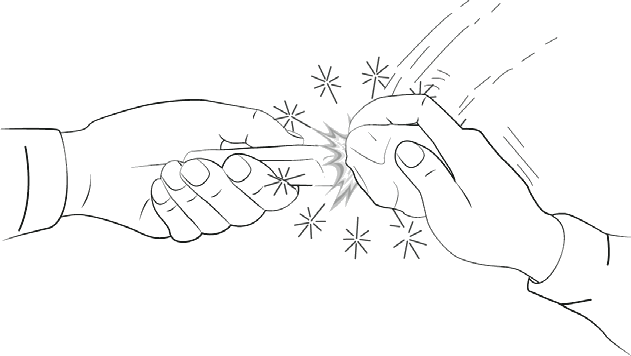
- Set your tinder on a dry base, fluffed up, with your kindling ready beside it.
- Hold the rod in your non-dominant hand and the striker in your dominant hand (5-39).
- Hold the rod near the top and press its bottom end firmly on or right next to the tinder.
- Put the edge of the striker against the top of the rod at a 90-degree angle.
- Push the striker down the rod with steady, even pressure, almost to the bottom. Sparks should shower into the tinder.
- Stop the stroke before the striker hits the tinder, or you will knock out the sparks.
- When the tinder catches, shield it from the wind and blow gently at its base until it flames, then add the smallest kindling.
Steps 2 to 6 follow ATP 3-50.21, paragraph 5-39.
Check it: practice at home until you get a flame in a few strikes. ATP 3-50.21 (5-37) says to test any metal match you buy, because quality varies.
Other ways from the same manual: on a bright sunny day, a magnifying lens can focus sunlight on tinder until it smolders, then you blow it into flame (5-41). Lighters and waterproof matches are quicker. Ready.gov’s kit list includes matches in a waterproof container.
See figure 5-8 in ATP 3-50.21 for spark-based fire starting.
Putting a fire out completely
Do this every time you leave a fire, even for a short time, and before you go to sleep.
- Drown it with water (NPS).
- Stir it with a stick or shovel so all embers, coals, and sticks get wet.
- Separate large burning pieces and rake the coals apart (ATP 3-50.21, 5-31).
- Add more water and stir again.
- Check under any rocks around the fire for burning embers (NPS).
- Carefully run the back of your hand near the surface to feel for heat (NPS). If you feel any, repeat steps 1 to 6.
Check it: ATP 3-50.21 (5-31) says the ground under where the fire was should be cool to the touch before you leave, and the Forest Service says to make sure a campfire is cold to the touch. ATP 3-50.21 (5-31) adds that dirt or sand works for fires fueled by petroleum.
Caution: if a fire gets away from you, the Forest Service says to call 911 and not try to put it out yourself.
Cooking fire safety
Use these rules for the kitchen stove, grills, and camp stoves.
In the kitchen (US Fire Administration):
- Stand by your pan. If you leave the kitchen, turn the burner off.
- If you see smoke or the grease starts to boil, turn the burner off.
- Turn pot handles toward the back of the stove.
- Keep a pan lid or baking sheet nearby. If a pan catches fire, cover it to put the fire out.
Grills and camp stoves (US Fire Administration):
- Use propane, charcoal, and pellet grills outside only. Indoor use can cause a fire or carbon monoxide poisoning.
- Place the grill well away from siding and deck railings, and out from under eaves and overhanging branches. Do not use or store a grill on a porch or balcony.
- Keep a 3-foot safe zone around the grill for kids and pets.
- Open a gas grill before lighting it.
- Do not walk away from a lit grill.
- Once grill coals have cooled, put them in a metal can with a lid.
- With a portable stove outdoors, clear the area of grass and debris and keep the stove from tipping (Forest Service).
Check it: nothing that burns within 3 feet of the grill, nothing overhead, and a lid within reach of the stove.
Using a fire extinguisher
Use it only on a small fire, and only after you have answered the US Fire Administration’s questions below. Ready.gov’s kit list includes a fire extinguisher.
First, decide (US Fire Administration). Use an extinguisher only if every answer is yes:
- Have you alerted others in the building that there is a fire?
- Has someone called the fire department?
- Are you physically able to use an extinguisher? (USFA says young children and older adults should not use them.)
- Is the fire small and contained in a single object or surface, like a pan or a wastebasket?
- Are you safe from the fire’s toxic smoke?
- Do you have a clear escape route?
If the answer to any is no, or you are unsure, alert others, leave the building, and call 911 from a mobile or neighbor’s phone.
Then PASS (USFA):
- Pull the pin. Hold the extinguisher with the nozzle pointing away from you and release the locking mechanism.
- Aim low, at the base of the fire.
- Squeeze the lever slowly and evenly.
- Sweep the nozzle from side to side.
Check your extinguisher (USFA): it should be easy to reach, the pressure gauge (if it has one) should read in range, and the can, hose, and nozzle should not be dented, damaged, or rusted. A multipurpose extinguisher labeled “A-B-C” can be used on most types of home fires, and it should carry a “UL Listed” or “ULC Listed” label. Your local fire department can help with extinguisher training.
Practice list
Fire skills
Ticks are saved in this browser only. About this